Friday 20 April 2012

Revlon Lip Butter Review

Hi again everyone, 


I got a voucher in the post for £2 off Revlon make-up at a Boots store, so today I went in and purchased one of their new Lip Butters.  these have been available in the USA since late last year and it seems like the UK have been waiting forever for them to be available here. 


I decided to only buy one to start with and see how I got on before i bought more so spent quite a while testing them out on my hand deciding what colour to buy.  In the end I picked 'Sweet Tart' as a warm pink that didn't seem too neon.  What do you think: 


The packaging is sooo cute!
The colour is so bright and yummy!
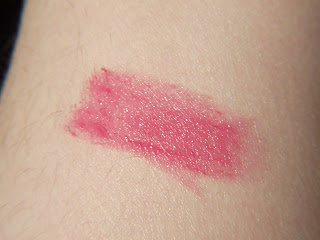
I tried this out my arm to show you the colour, of course it looks a lot bright but remember on your lips it will be a bit less intense.  I did try to photograph it on my lips but I discovered its a lot harder than it looks, but don't worry I'll keep trying! 
It goes on soft and smooth without the sticky feeling
I must admit I can see why people are raving about these.  They have the soft and smoothing texture of a lip balm, and the intense colours of a lipstick. All in all I would highly recommend you give these a try, I know that I will definitely be going back for more shades!


Leave me a comment and let me know if you have bought a Lip Butter too? Do you love?


See you soon


Love Jude


xxxx

Monday 16 April 2012

Going Polka!

Hello,

It's been a bit of a hectic weekend, so not had much time to write, so I thought I would sit down and catch up today.  

Saturday night I fancied a change, so I got out the many, many nail polishes in my collection and decided to be a bit creative with some drug store colours. I hope you like the result:

Apologies for the claw, I didn;t have the bottle to hand!


This look is made entirely with Barry M Nail polish, just to show you you don't have to use big expensive brands to get awesome nail designs.  The base colour is Raspberry pink and using a dotting tool i just dipped it into the Barry M white polish and dotted it onto the nail in lines. You could also do a random dotting for a different look.


I topped it Barry M 2-in-1 Base and top coat which has kept it chip free so far and I have had quite a few comments from people loving the look, so I am definitely going to try this in different colour combinations later.

On the way home from work on Friday I had a bit of shop in Boots and Superdrug and am so excited to show you all the goodies I got, but that's for another time.

See you again soon,

Love Jude

xxxx

Wednesday 11 April 2012

OPI NYC Ballet Collection

Good evening everyone,


I just wanted to write you a quick note to let you know how excited I am for the new OPI collection, which will hopefully make it to my local store before the end of April. Its called the New York Ballet Collection, and its a set of sheer pastels and an iridescent silvery glitter which I think is going to look amazing layered on top of so many of the spring pastel colours out right now.


As soon as I can get my hands on some of these beautiful colours I will show you some swatches. I've found a photo of the collection so you can have a look, let me know what you think in the comments box below.

My Pointe Exactly, Care to Danse?, You Callin Me a Lyre, Barre My Soul,
 Don't Touch My Tutu, Pirouette My Whistle
See you soon

Love Jude 

xxxx

Tuesday 10 April 2012

Getting Crafty with Distress Inks!

Good afternoon,

I hope that where ever you the weather is looking as gorgeous as it is here today, long may it last!

In a couple of weeks I will be starting in a new department at work, so I wanted to let the people in my team know that I will miss them so I've been making them some little Thank you/Goodbye cards.

I have been inspired by some brown rustic card I bought at a craft fair and decided to try and make the cards look vintage and rustic. I used a range of different papers that I have collected but aged them dramtically using a couple of ink pads that have been developed for just this use. Ranger have worked with a the creative master that is Tim Holts and created a range of ink pads, bottled inks, sprays, grunge board shapes, cutting dyes and much more. In the first of my cards I used the Distress ink pads in colours Tea Dye and Walnut Stain and blended them into the edges of the card and paper. I screwed up and then unscrewed the patterned paper and applied more ink to create an even more aged look.
Using Ranger's Distress Ink in Tea Dye & Walnut Stain
In the card above I also used a sanding block on the brown paper to remove some of the colour and make the paper look more worn and vintage.  To add a slight metallic touch I dye cut a simple swirl design from gold mirror card and again used the sanding block, to make it look more antiqued. 

With the finishing touch of crackle glaze on the letter D and a piece of rafia grass tied around the spine of the card I feel I have reached my aim with this card.  Please see below a couple of the other cards in the collection, all with their own variations so they were not all the same.
I used a paper doily and stick on pearls to make this more femine
Here I broke up the dye cut swirl to create a different look
Because I have custom cut the side of these cards I will have to make my own envelopes, but I have a template for this so just have to find the right paper!

I know this post has been a bit different to my first couple but I want to share all my loves in both beauty and craft, and hope that I inspire you to be more creative yourself.

Love Jude

xxxx


Monday 9 April 2012

Nails Inc's & O.P.I Mash-up

Hello again,


Apologies for not posting yesterday when I said I would, after getting home late from the BBQ, yesterday seemed to fly by and I was fighting to cram everything in. 


Don't be too sad though, because it means I have a two things to talk to you about today. The first being the the new manicure I did last night. It involves 3 different brands but I think they look so good together I may mix and match more often. The main colour is by Nails Inc and it is called "Warwick Way". If you are not familiar with the Nails Inc polishes, they are a British Company whose polishes are all named after streets in London, with their most popular polish being named after the location of their first salon on South Molton Street. I adore Nails Inc polishes especially the creme colours they bring out. They come in an amazing array of colours and are so easy to apply, Warwick Street is no different.

Nails Inc - Warwick Way
After several attempts this is the best photo I could get of the colour, as in real life it appears much more green, or what I would describe as a nearly-neon teal. The colour on my nails is more accurate. 


The second polish I used is by OPI, its called "Rainbow Connection" and is from their Muppets Collection that came out in the Winter of 2011. I was bought this particular polish for Christmas as part of a set, and will be showing you the second part of that set in a few weeks time.  Its an amazing glitter polish that as the name suggests contains a rainbow of small glitter and hexagon glitter.  The glitter is set in a clear base, so although with multiple coats this could be used on its own, it works a lot better as a layering polish. 
O.P.I - Rainbow Connection
I would suggest that one layer of this polish is best if you want to see the base colour, but it is not very self-settling. by that I mean that you will find yourself having to move the glitter around the nail so it looks more even, but using two coats gives too much coverage I find.  Never the less I still love this polish as it goes with any colour you care to put it with, for that extra bit of sparkle!  

On a side note Model's Own have recently teamed up with Head Kandi and created a polish very similar to this called "Ibiza Mix" so I will be doing a direct comparison for you gals within the next few weeks.

Finally to make this manicure just a bit different I decided to use a Matte topcoat I got at the end of last year from Boots. It is by Boots own brand 17, and I believe only cost me around £2 or £3.
Boots 17 - Matte Top Coat
I am super impressed with this Top Coat only having used it once or twice, it has never failed to create a completely different look to my manicure. It applies very easily and dries very quickly, you can actually watch the polish go from shiny to matte before you eyes, its quite mesmerizing! I would recommend using two coats just to be sure, as it appears to go on quite thin. Other than that though I haven't had any real problems with this drug store polish and considering how much you can pay for high-end matte polishes, this is a cheap alternative to create your own.
Having just realised how long this post is I think I will put the second part of my day's events into a separate one, so I hope you have enjoyed reading this and that it as been helpful/informative.


Please leave your comments below on how I am doing so far, I would love your feedback to help me make this a better blog for you gals to read.


Love Jude


xxxx

Saturday 7 April 2012

Welcome to my world!

Hello everyone/anyone who finds this little part of the internet I like to call Jude's addiction,


I'm Jude, I am currently 23 years old and living in not so sunny England. I have been wanting to start a blog for ages but never thought anyone would want to read my ramblings. However I decided even if I am the only one who reads them, its a good way to keep all my thoughts and memories together.


Anyway enough about me, my blog promises to have all things bright, colourful and sparkly so start off I thought I would tell you about this fab nail polish I am currently sporting. Its called Purple Haze and its by Model's Own. They are a little British company that create fabulous make-up but they are most well known for their glitter nail polishes. I have several of them now and will be showing you my collection later, but this colour is so fabulous I just had to show you it on its own.
Models Own - Purple Haze (No Flash)
Isn't it just gorgeous? They have just packed this polish with so much of what I would call true or royal purple glitter that my nails have only 2 coats on and they are opaque! As I took closer and closer shots of my manicure I noticed that there is also tiny flecks of blue and pink glitter in there too, but not enough to distract from the amazing purple colour. 

Here is a close up of my nails so you can see what i'm talking about:
Please excuse the horrid state of my cuticles!
Model's Own make-up and polishes can be found in most Boots stores in the UK or on their website.  They are all really well priced at just £5 each or if you just can't decide which colours to get they do great boxsets with six polishes for just £20 = BARGAIN!!!  I have ordered several times from their website and have found them great to deal with, for orders under £99 the postage is only £2.95. This is a great delivery price considering you could get nearly 30 polishes delivered (if you got 5 boxsets) and still only pay £2.95 postage! Their delivery time is also very quick, I waited only 2 days from ordering before getting one of my parcels! They come superbly packaged in cute little boxes and I have not had one arrive damaged or leaking. Bascially an awesome service with great products!

This manicure has so far lasted about 3 days with only one coat of topcoat (I use Nails Inc. Kensington Caviar base and top coat, I will be reviewing these soon) but has now started to chip so as I am going to a birthday BBQ this afternoon, I may well change this polish for something just as bright and colourful. I'll let you know tomorrow what my decision is!

Thanks for reading, I hope you enjoyed my first post.

Love Jude

xxxx


Related Posts Plugin for WordPress, Blogger...